In this post, we will explore the mechanics of a simple no-nonsense bicycle seatpost collar. What encourages me you ask?
I was alerted to a Thomson seatpost failure at the Weightweenies forum. The item is a "Masterpiece" brand, the lighter cousin of the utilitarian "Elite". The post severed at the seatpost clamp as an image provided shows. Thomson makes everyone's favorite seat-posts.
As we often have it in such cases, the claim from the poster is that a torque wrench was indeed used to install the product and it was done so by a "pro mechanic". By that, I take it that he knew what he was doing. By that, I meant that he did not give a "few extra" turns than required to tighten the screw.
You may know that I have explored two other Thomson seatpost breakages in detail this year. Those efforts involved a background study of Thomson's seat post design and interviews with the user and the product person over at Thomson. Statistically, in the end we all had to agree to the idea that such failures result more from a common human condition called the "Over-Tightening Syndrome". I have written about it here with the help of Thomson's Dave Parrett.
As for this new breakage, it is advisable to let Thomson know so they can test it for signs of extraneous use of force. There's also a good chance they might replace it for the customer on goodwill/warranty.
The common cyclist's seatpost clamp may be closely approximated by what they call in engineering circles as a "Split-Ring Clamp Type Shaft Collar" (there are all kinds of weird shapes and designs out there for bicycle seatpost collars but we will limit this discussion to circular). A hex socket cap screw is used to clamp the collar around the seatpost so it constrains it from motion/slippage due to seated weight acting downwards.
When the collar is set with the cap screw, three brilliant things are taking place in your equipment that you probably never heard of :
1) Pre-Loading The Cap Screw : As the cap screw is tightened in the collar, it is stretched to produce the clamping force regardless of the external load. This force, or initial tension, is called a "Pre-load". So without considering the external load, the torque necessary to achieve this pre-load is given by the relation :
The seat post manufacturer or supplier is to select/supply capscrews that have sufficient pre-load capability. They specify diameter, pitch, threads per inch etc of said screw for the particular service. Pre-load force is found from the torque desired.
The pre-load stress is found by dividing pre-load tension over the tensile stress area for the fastener from reference tables. The same process is used to calculate service load stresses, i.e external stress divided over the tensile stress area of the fastener. When you have these two quantities, a pre-load stress and a service load stress, you compare them both to the known proof strength of the said fastener from reference tables. Ideally, they should be lower from the proof strength by a sufficient safety margin because proof strength is the maximum load a screw/fastener/bolt can take before acquiring a permanent set (plastic deformation, no good).
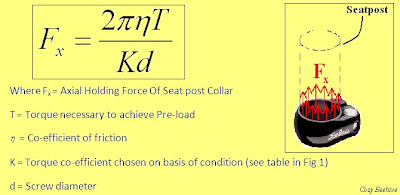
2) Axial Holding Force : When tight, an internal pressure acts on the collar surface due to contact with the seatpost through its internal diameter. There exists an axial holding force from the collar that is proportional to the co-efficient of friction between the collar and seatpost and the torque in the screw. Avoiding lengthy integral based derivations, axial holding force is given by :
3) Hoop Tension : A tangential component of stress acts inside the collar at any radius due to the action of internal pressure of the seat post mentioned above. It is called "Hoop Tension". By relating this tangential stress αt to hoop tension, we arrive at the following relation :
When the collar is set by tightening the cap screw to some torque value, the hoop tension is equal to the screw tension. This is the role of the screw - to induce hoop tension so that it produces clamping for the seatpost.
Armed with that knowledge and the above 3 equations, one can easily find the tension in the screw and the internal pressure of the seat post on the collar. While out of the scope of this blog, you can even calculate the maximum shear stresses in the collar and find out your factor of safety for the design so that it is safe for a rider to use.
You can take this information further and ask - what happens if I screw my cap in too much, vastly exceeding specified torque values? The result could be too much hoop tension, too much clamping force, too much shear stress, too much pre-load. Its a combination of these things and/or manufacturing related defects and the kind of external loadings induced by the weight of the rider and his usage patterns which all set a clear path to failure.
So be cognizant of these things... and why, Happy New Year too! :)


